Automating LDAP User Creation with Python
This is an example of code from a Python script that I created to automate the addition of users to various LDAP groups. Key functions of this script are as such:
- Runs using arguments for username, first and last name (and outputs to the script runner what the valid options are).
- Generates the next available UID automatically.
- Allows for input of LDAP administrative password outside of the script, as an extra security precaution.
- Menu-driven for ease of use. Allows for adding user based on role and will join the user to the appropriate groups.
#!/usr/bin/env python
# -*- coding: utf-8 -*-

import ldap
import ldap.modlist as modlist
import sys
import subprocess
import argparse

# Find next available UID
lastuid = subprocess.check_output('getent passwd | cut -d \':\' -f3 | sort -n | tail -1', shell=True)
nextuid = int(lastuid) + 1
uidnumber = str(nextuid)

# Argument checker
parser = argparse.ArgumentParser(description='Arguments for new user creation')
parser.add_argument("-u ", "--username", dest="username", required=True, help="username required")
parser.add_argument("-f ", "--FirstName", dest="firstname", required=True, help="First Name required")
parser.add_argument("-l ", "--LastName", dest="lastname", required=True, help="Last Name required")
args = parser.parse_args()

# Connection settings
server = "ldap://ldapserver.company.net:389"
user = "cn=manager"
passwd = raw_input("Enter the Manager password ")

# Other variables
fullname = (args.fircompanystname) + " " + (args.lastname)
netgroupname = "(," + (args.username) + ",)"
baseou = ""
defaultpw = "DefaultPassword"
### -NOTE- this should coincide with a policy that requires change upon first logon

# Group DN paths
developer_dn = "cn=developer,ou=Group,dc=company,dc=net"
splunk_developer_dn = "cn=splunk_developer,ou=Group,dc=company,dc=net"
web_dn = "cn=web,ou=Group,dc=company,dc=net"
admin_dn = "cn=admin,ou=Group,dc=company,dc=net"
splunk_admin_dn = "cn=splunk_admin,ou=Group,dc=company,dc=net"

# Add new user to the proper OU
def adduser():
    print (30 * '-')
    print (" What category user is this?")
    print (30 * '-')
    print ("1. Development")
    print ("2. Corporate")
    print ("3. Administrators")
    print ("4. QA")
    print ("5. Acme-Offshore")
    print (30 * '-')

## Get input ###
while True:
    choice = raw_input('Enter your choice [1-5] : ')
    if choice == "1":
        print ("Adding user to the .development OU...")
        baseou = ".development"
        dn = "uid="+(args.username)+",ou="+(baseou)+",ou=People,dc=company,dc=net"
        connect.add_s(dn,add_record)
        print ("Adding user to the appropriate additional groups...")
        devgroups()
        break
    elif choice == "2":
        print ("Adding user to the .corporate OU...")
        baseou = ".corporate"
        dn = "uid="+(args.username)+",ou="+(baseou)+",ou=People,dc=company,dc=net"
        connect.add_s(dn,add_record)
        break
    elif choice == "3":
        print ("Adding user to the .administrators OU...")
        baseou = ".administrators"
        dn = "uid="+(args.username)+",ou="+(baseou)+",ou=People,dc=company,dc=net"
        connect.add_s(dn,add_record)
        print ("Adding user to the appropriate additional groups...")
        admingroups()
        break
    elif choice == "4":
        print ("Adding user to the .qa OU...")
        baseou = ".qa"
        dn = "uid="+(args.username)+",ou="+(baseou)+",ou=People,dc=company,dc=net"
        connect.add_s(dn,add_record)
        break
    elif choice == "5":
        print ("Adding user to the .offshore, .acme OU...")
        baseou = ".acme"
        dn = "uid="+(args.username)+",ou="+(baseou)+",ou=.offshore,ou=People,dc=company,dc=net"
        connect.add_s(dn,add_record)
        break
    else:
    print ("Invalid number. Try again...")

# Add to development groups
def devgroups():
    connect.modify_s(developer_dn,mod_attrs)
    connect.modify_s(splunk_developer_dn,mod_attrs)
    connect.modify_s(web_dn,mod_attrs)

# Add to administrator groups
def admingroups():
    connect.modify_s(admin_dn,mod_attrs)
    connect.modify_s(splunk_admin_dn,mod_attrs)

# Add user record
add_record = [
  ("objectclass", ["person","organizationalPerson","inetorgPerson","top","posixAccount","shadowAccount"]),
  ("uid", [(args.username)]),
  ("cn", [(fullname)]),
  ("sn", [(args.lastname)]),
  ("givenName", [(args.firstname)]),
  ("userPassword", [(defaultpw)]),
  ("uidNumber", [(uidnumber)]),
  ("gidNumber", ["100"]),
  ("gecos", [(fullname)]),
  ("shadowMax", ["99999"]),
  ("shadowLastChange", ["99999"]),
  ("homeDirectory", ["/home/"+(args.username)]),
  ("mail", [(args.username)+"@company.com"]),
  ("loginShell", ["/bin/bash"]),
]

# Modify groups
mod_attrs = [
( ldap.MOD_ADD, 'memberUid', [(args.username)] )
]

# Open synchronous conection to LDAP
connect = ldap.initialize(server)
connect.simple_bind_s(user,passwd)

adduser()

# Print nice output
print ###############################
print "Username is: " + args.username
print "UID is: " + uidnumber
print "Password is: " + defaultpw
print ###############################

# Disconnect from LDAP server
connect.unbind_s()
vSphere 5.5 how to add domain users to SSO
So you’ve installed your ESX servers and installed vCenter along with its SSO, Inventory Services and Web Client, you’ve even installed the Windows vSphere UI just because that’s what you’re used to and now when you’re connecting to your new environment your getting a “You do not have permission to login to this server”
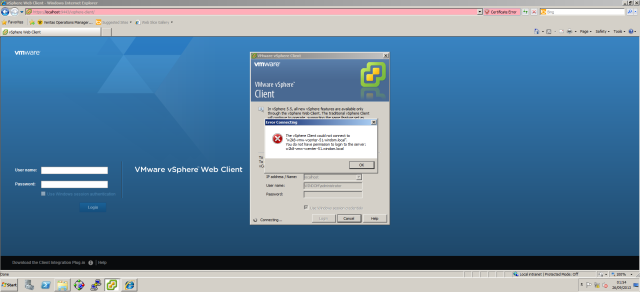
So with this new version of vSphere you need to enable access for your domain users/groups so that they have access to vCenter.
To get you up and running fast follow these simple steps. for best practices configuring SSO please reference the VMware documentation.
1. Login to the Web client “https://client-hostname:9443/vsphere-client” with administrator@vsphere.local using the password of what ever you configured SSO password as. *Note you can only configure SSO using the Web Client*
2. Navigate to vCenter Servers > Manage > Permissions, click on the + to add a user
3. Now add your…
View original post 118 more words
Setting a Cron Job to Run at the End of the Month
This is a method to be able to run a cron job on the last day of month, as this is not easily supported. This method will support any month (from 28 days to 31 days), although you could run this every day with no consequence. It utilizes an expression that takes the current day (plus one day forward in the future) as a number minus the current day as a number. If the value is less than or greater than 0, then the command will run.
For example, if today is the 31st of the month, the expression will add one day in the future, so the first number would be “1”, the second number would be “31” – therefore the value is -le 0, so the command will run.
0 23 28-31 * * [ $(expr $(date +\%d -d '1 days') - $(date +\%d) ) -le 0 ] && echo true
comm – utility for easily comparing files (better than diff)
Comm is a very useful GNU program that is better than diff for finding unique lines between two given files. A good example would be one file with a big list of IP addresses, with another file that has a small list of IP addresses. In this example, the IP addresses in the small list are presumed to be present in the big list, but short of doing an advanced script using find, this is a quick and clean way to find the duplicates.
With no options, produce three-column output. Column one contains lines unique to file1, column two contains lines unique to file2, and column three contains lines common to both files.
-1 suppress lines unique to file1
-2 suppress lines unique to file2
-3 suppress lines that appear in both files
NOTE: The files MUST be sorted first, or the results will not be accurate.
##################################
contents of file1:
192.168.1.0
192.168.1.1
192.168.1.4
192.168.1.5
192.168.1.6
192.168.1.7
201.44.32.4
201.44.32.5
201.44.32.8
201.44.32.9
contents of file2:
192.168.1.1
192.168.1.5
201.44.32.5
201.44.32.8
#################################
Example (to find only the unique IP address in file1)
comm -3 file1 file2
# output
192.168.1.0
192.168.1.4
192.168.1.6
192.168.1.7
201.44.32.4
201.44.32.9
BASH redirection reference
#!/bin/bash

# redirect stdout to file
cmd > file
# redirect stderr to file
cmd 2> file
# redirect both stderr and stdout to file
cmd >& file
# pipe cmd1's stdout to cmd2's stdin
cmd1 | cmd2
# pipe cmd1's stdout and stderr to cmd2's stdin
cmd1 2>&1 | cmd2
# print cmd1's stdout to screen and also write to file
cmd1 | tee file
# print stdout and stderr to screen while writing to file
cmd1 2>&1 | tee file
I recently had to configure iSCSI with multipathing on RHEL 6. It wasn’t too hard and these instructions will presumably work with other Redhat based versions & distros
It involves installing/configuring the iSCSI utilities and then installing/configuring Device-Mapper. Device-Mapper will automatically discover devices with multiple paths and creates a mpath device that can be used to load balance/failover between all the paths.
1.) Install iSCSI and Device-Mapper
# yum install iscsi-initiator-utils
# yum install device-mapper-multipath
2.) Start iSCSI
# chkconfig iscsi on
# chkconfig iscsid on
# service iscsi start
# service iscsid start
3.) Find your hosts IQN and Update your iSCSI Array
Each iSCSi device will have a iSCSI Qualified Name (IQN). This name is used to manage LUN masking on the iSCSI arrays.
# cat /etc/iscsi/initiatorname.iscsi
Once you have your IQN you then need to go to your iSCSI array and carve out the LUNs you plan…
View original post 637 more words
Python – writing to a file on a fileystem to test I/O
This is very useful Python script that will allow you to test writing to a file on a filesytem. This can be used to verify that their are no I/O read or write failures during an extend or migration of a filesystem.
#!/usr/bin/python

import time
testfile = "/dbbackup-01/testfile.txt"

for i in range(100):
    print i
    fo = open(testfile, "a")
    fo.write('test write while the filesystem is being modified\n')
    print fo.name
    fo.close()
    time.sleep(0.2)
Combining multi-line events into single transactions in Splunk
This can be used to group together multiple lines, of which belong to the same thread. You can pipe the data to a “transaction startswith/endswith” as described below, and Splunk will group the lines into a single shared “transaction”. Then the “table” command basically creates a table of the output of the field.
NOTE: This is slow and very taxing for Splunk, so do it against a short time frame, and don’t schedule any reports to do this (the “transaction” function).
source=”/source/to/data” (host=”server1″ OR host=”server2″) | transaction startswith=”starting word” endswith=”ending word” | search field1 | table field2
Joining RedHat Servers to Active Directory
Joining Redhat servers to AD domain
~~~~~~~~~~~~~~~~~~~~~~~~~~~~~~~~~~~~
yum install samba3x
yum install winbind
vim /etc/nsswitch
=================================
passwd: files winbind
shadow: files winbind
group: files winbind
=================================
vim /etc/samba/smb.conf
===================================
workgroup = DOMAINNAME
password server = x.x.x.x
realm = DOMAINNAME.COM
security = ads
idmap uid = 10000-20000
idmap gid = 10000-20000
winbind separator = +
template homedir = /home/%D/%U
template shell = /bin/bash
winbind use default domain = false
winbind offline logon = false
====================================
net ads join -U user@domainname.com
Backup and Archive Nagios
This is a shell script that can be used to backup a Nagios configuration (or any group of files/directories in Linux or UNIX) locally, and to sync the backups to a remote location. This script works perfectly when there are two different Nagios instances in different locations, and this script can be used on both servers to backup and archive, and then rsync the files to the remote side – just by changing the three variables at the top of the script. Logging and emailing results of each job can be added in to the script as well.
A best practice that I implemented is to use SSH shared keys for the rsync. Use a non-root account and send the traffic along a trusted VLAN. This allows for the SSH to not prompt for a password every time the script is run, which should be automated through a cron job.
#!/bin/bash

####################################
###### Local System Variables ######
####################################

NAGIOS=usr/local/nagios
LOCAL=/local/directory/path
REMOTE=user@server:/local/directory/path

####################################
####### DO NOT CHANGE BELOW ########
####################################

BACKUP=$LOCAL/nagios-backup.tgz
DATE=`date +"%F-%T"`

export LOCAL
export REMOTE

### check to see if current backup file exists ###
if [ -f $BACKUP ]
then
  echo "Backup file exists."
  mv $BACKUP $BACKUP-$DATE
  tar czf $BACKUP -C / $NAGIOS
else
  echo "Backup file does not exist...creating."
  tar czf $BACKUP -C / $NAGIOS
exit
fi

### remove files older than seven days ###
find $LOCAL -type f -mtime +7 -exec rm {} \;

### change the permissions of the file to the backups user ###
chown -R backups:backups $LOCAL

### change to backups user to run the rsync script ###
su backups -c /home/backups/rsync-files.sh

### rsync the files to the DR backup site ###
rsync -avz --delete $LOCAL/ $REMOTE
